Last updated on
Learn how to properly install a metal roof on your shed for a durable and long-lasting covering.
Key takeaways:
- Gather necessary tools: screw gun, tin snips, tape measure, etc.
- Gather required materials: metal panels, roofing screws, underlayment, etc.
- Calculate square footage and purchase enough materials (10-15% overage).
- Remove old roof coverings and debris before installation.
- Install ridge caps or closure strips at peak of roof.
Tools Required

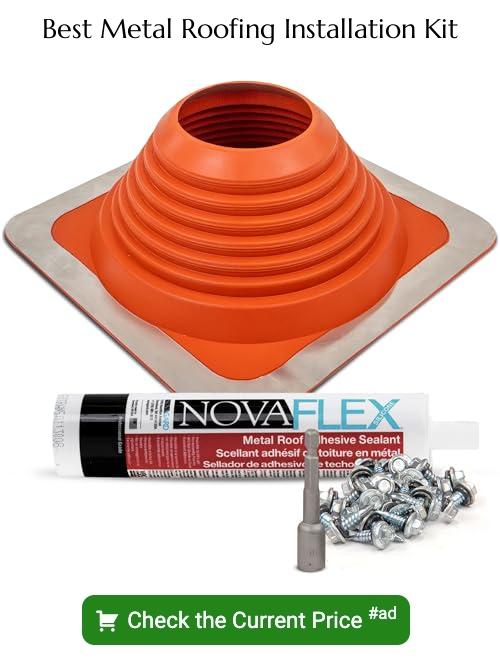
Before starting your metal roofing project, ensure you have all the necessary tools. A screw gun or drill with a metal roofing screw bit will facilitate secure fastening. Tin snips are essential for cutting panels to size, and a tape measure will guarantee accurate measurements. A chalk line is useful for creating straight, uniform lines for panel placement.
To navigate the roof safely, a ladder and proper safety equipment like non-slip shoes, gloves, and eye protection are imperative. A carpenter’s level and a hammer may also prove useful for alignment and adjustments. Keep in mind, using the right tools not only eases the installation process but also contributes to a more professional and long-lasting finish.
Materials Required
Before beginning the installation, ensure you have gathered all necessary materials. You will need metal panels, which should be selected according to the specific size of the shed and preferred aesthetic. Additionally, gather a sufficient number of roofing screws, ideally with rubber washers to aid in waterproofing.
Underlayment is also essential – often synthetic or felt – to provide an extra barrier of protection between the metal and the roof deck. For the ridge of the shed, ridge caps are required to seal the juncture where different panels meet. Flashing material, such as drip edges and gable trim, should be at hand to redirect water and prevent seepage at the roof’s edges and penetrations.
Lastly, safety should never be compromised. Consider acquiring sealant for joins and fastener points, and make sure you have enough tools and safety gear to complete the installation securely.
Calculating Square Footage and Purchasing Appropriate Amounts of Materials
Measure the length and width of the shed roof to determine its square footage. Multiply these dimensions to attain the total area needing coverage. Account for a 10-15% overage to ensure you have sufficient material for overlap, trimming, and waste.
Consult with your metal roofing supplier to understand the specific coverage of the panels you select, as this will influence the total amount you need to purchase. Remember to include additional materials for flashing, ridge caps, and fasteners in your calculations to ensure a complete installation.
Always round up when purchasing supplies to guarantee your project isn’t stalled by a shortage of materials.
Removing Old Roof Coverings and Debris
Before commencing the installation of a new metal roof, it’s crucial to clear the shed’s existing surface. Carefully pry away any nails, staples, or fasteners that hold the current roofing materials in place. A roofing shovel or a flat pry bar can be useful tools for this task, allowing you to slide beneath shingles or panels and lift them away.
Wear gloves and protective eyewear to safeguard against sharp edges and debris. Place removed materials into a dumpster or a designated disposal area to keep the worksite clean and prevent any obstruction.
Scrape off any remaining roofing cement or adhesive with a putty knife or scraper. This step ensures a smooth, clean base which is vital for proper metal roof installation.
Dispose of old roofing material responsibly, checking with local disposal regulations to ensure compliance. After clearing the roof, remove any protruding nails or staples from the decking to create a flat surface, ready for the new installation. If the existing roof has sustained water damage or rot, replace any compromised wood or structural elements before proceeding.
Installing Ridge Caps or Closure Strips At Peak of Entire Roof
Ridge caps and closure strips play a crucial role in sealing the peak of your shed’s roof, ensuring water tightness and preventing moisture ingress that can damage the structure. Begin the installation process only after the metal roofing panels are in place and properly secured.
1. Measure the Length of the Roof Peak: To ensure a perfect fit, measure the length of the shed’s peak from end to end.
2. Cut the Ridge Cap to Length: If necessary, trim the ridge cap to match the length of the peak, leaving a slight overhang on both ends to cover the top ends of the side panels.
3. Place Closure Strips: Fit the closure strips snugly onto the ridges of the topmost metal panels. These foam or rubber strips fill gaps to prevent insects and debris from entering.
4. Secure Ridge Cap Over Closure Strips: Center the ridge cap over the peak, ensuring it covers the ends of the panels on both sides. Secure it in place by driving screws with rubber washers through the cap and into the roofing panels and closure strips at regular intervals.
5. Apply Sealant: For additional protection, apply a bead of exterior-grade sealant along the edge where the ridge cap meets the roof panels.
6. Ensure Proper Overlap: If the peak requires more than one piece of ridge cap, overlap the pieces by at least 6 inches, applying sealant between the layers to create a continuous water-resistant barrier.
By carefully following these steps, you provide your shed with the necessary protection against the elements along its most vulnerable point – the peak.
Read More
 Standing Seam Metal Roof Installation: Your Guide to a Durable and Stylish Finish
 Pitched Roof Perks: How It Tops Flat Alternatives
 Asphalt Roof: Your Guide to Longevity and Savings
 Slate Roof Cost: What to Expect and Why It’s Worth the Investment
 Shingle Roof Cost: Your Wallet’s Best Friend or Foe?