Last updated on
Exploring the benefits of a Starlink roof mount becomes essential because this cuts-edge technology can have different impacts on signal quality, aesthetics, and lifespan of your roof that you might not have considered yet.
Key takeaways:
- Compatibility: Starlink roof mounts are compatible with the Dishy satellite dish.
- Design: Roof mounts are engineered for stability and include base plates or brackets.
- Orientation: Mounts need to be aligned for optimal dish orientation towards the satellite.
- Materials: Mounts are constructed from durable materials like galvanized steel.
- Elevation Adjustment: Mounts allow for elevation adjustment to enhance signal reception.
Understanding the Starlink Roof Mount
The Starlink Roof Mount is a specially designed fixture that securely attaches your Starlink satellite dish to your rooftop. This mounting solution is necessary for optimal satellite signal reception, ensuring a clear line of sight to the sky.
Key points to comprehend include:
- Compatibility: The mount is compatible with the proprietary Starlink satellite dish, also known as the ‘Dishy’.
- Design: Engineered for stability, these mounts typically include a base plate or bracket system that sits flush with the roofing material.
- Orientation: It’s critical to align the mount to facilitate Dishy’s optimal orientation towards the satellite constellation.
- Materials: Constructed from durable materials like galvanized steel, these mounts are built to withstand various weather conditions.
- Elevation Adjustment: The mounting system allows for elevation adjustment, compensating for roof pitch and enhancing signal reception.
- Cable Routing: Considerations for routing the cables from the dish to your home are inherent to the design, ensuring a neat install.
By grasping these fundamental aspects, homeowners can appreciate the importance of a proper roof mount in the Starlink Internet setup process.
Types of Starlink Roof Mounts

Starlink’s offerings include several roof mount options, each designed to accommodate a variety of roofing materials and slopes. The Volcano Mount is apt for flat or sloped surfaces, providing a secure base without the need for drilling, which is ideal for preserving the integrity of the roofing material. The Ridgeline Mount, conversely, is engineered for peaked roofs, allowing for installation along the roof’s apex to maximize satellite visibility.
For users seeking a non-invasive solution, the Non-Penetrating Roof Mount stands out. It utilizes weights, rather than screws, to anchor the system, thus conserving the roof’s condition. The Pole Mount can be attached to existing structures or poles, making it flexible for non-traditional roof setups or ground installations.
Each mount type is designed with durability and ease of installation in mind, and it is crucial to select the appropriate one to ensure a secure and optimal satellite connection. Compatibility with roof type, satellite visibility, installation complexity, and weather conditions are key factors guiding the selection process.
Installation Process
To successfully install a Starlink Roof Mount, it’s essential to follow a clear step-by-step procedure:
1. Site Selection: Identify the part of the roof with the least obstruction to ensure a clear view of the sky, which is vital for satellite reception.
2. Safety Precautions: Use a sturdy ladder, secure safety harnesses, and wear protective gear. Working at heights can be hazardous; prioritize safety at all times.
3. Unboxing and Pre-Assembly: Unpack the Starlink kit and organize all components. Pre-assemble the mount to the extent possible on the ground to minimize time spent on the roof.
4. Roof Preparation: Clean the chosen area to provide a stable surface for the mount. If using a non-penetrating mount, place a protective barrier to safeguard the roof membrane.
5. Mounting: For a peak roof mount, align the base with the roof’s peak and secure it using the provided brackets and sealant. For a non-penetrating mount, ensure weights like concrete blocks are in place for stability.
6. Dish Placement: Attach the Starlink dish to the mount following the manufacturer’s guidelines to avoid damaging the equipment.
7. Cable Routing: Run the cables to your home, avoiding sharp bends and using clips to secure them along the path to prevent tripping hazards.
8. Grounding: Implement adequate grounding to protect against electrical surges from lightning strikes.
9. Signal Testing: Once mounted, adjust the dish’s orientation to optimize signal reception using Starlink’s app or onboard settings.
Remember, the specific details can vary based on mount type and roof style; always refer to the installation manual that comes with your Starlink kit for exact instructions.
Mounting On Different Roof Types
Selecting the appropriate Starlink Roof Mount for your specific roof type is essential for a secure installation and optimal connectivity. Here’s a concise guide on what to consider for various roof materials and designs:
- Asphalt Shingles: These are the most common residential roofing material. It’s crucial to align the mount so the bolts penetrate the roof rafters for stability. Sealant is a must to prevent leaks.
- Metal Roofs: Metal roofs require specialized mounts that do not penetrate the surface to avoid leaks. Use mounts that clamp to the seams instead.
- Tile Roofs: Tile roofs present a unique challenge due to their fragility. Use mounts designed to fit the specific tile type and ensure they are secured to the roof structure beneath.
- Flat Roofs: For flat roofs, a non-penetrating mount weighted down by bricks or concrete blocks prevents damage to the roofing material.
- Sloped Roofs: Sloped roofs may necessitate additional bracing or mounts that can adjust to the angle of the slope for a secure fit.
In every scenario, ensure that the mount is securely fastened to prevent damage from wind uplift and that it offers a clear view of the sky for maximum satellite connectivity. Always refer to the manufacturer’s guidelines and local building codes when installing your mount.
Safety Considerations
Ensuring safety is paramount when installing a Starlink Roof Mount. Follow these guidelines to minimize risk:
1. Wear proper safety gear: Use a harness, gloves, and non-slip footwear to prevent falls and injuries.
2. Check local building codes: Confirm that your installation adheres to regional safety standards and acquire necessary permits.
3. Secure the ladder: Make sure the ladder is stable and extends at least three feet above the eave for safe access.
4. Avoid power lines: Maintain a safe distance from electrical lines to prevent electrocution.
5. Monitor weather conditions: Do not attempt installation during adverse weather; high winds and wet surfaces increase the risk of accidents.
6. Follow manufacturer instructions: Use the tools and techniques recommended by Starlink to ensure a safe and correct setup.
7. Consider a professional: If in doubt, hire a qualified installer familiar with satellite dish mounting and roof safety.
Weather and Environmental Impacts
High winds, heavy rain, and snow loads can affect the stability and functionality of a Starlink roof mount. It’s critical to ensure the mount is designed to withstand local weather conditions.
A well-installed roof mount should have a sturdy base that can resist wind uplift and have a path for water to drain away, preventing pooling. Additionally, consider snow accumulation in winter climates; snow guards may be necessary to prevent snow from sliding off the dish and stressing the mount.
The materials used, typically stainless steel or aluminum, should be corrosion resistant to endure varying environmental exposures over time. For areas prone to lightning, proper grounding is essential to protect both the Starlink system and your property.
Regular inspections after extreme weather events will help ensure continued safe and efficient operation.
Maintenance and Upkeep
Regular maintenance of your Starlink roof mount ensures the longevity and performance of your satellite internet system. Here are key points to ensure proper upkeep:
Inspect the Mount: At least twice a year, examine the mount for any signs of wear, corrosion, or loosening components. In areas with severe weather, more frequent inspections may be necessary.
Check for Debris: Remove leaves, twigs, and other debris that could obstruct the satellite’s view of the sky or lead to the accumulation of moisture.
Tighten Connections: Periodically tighten any bolts or screws that may have become loose due to thermal expansion or vibration.
Verify Alignment: Make sure that the Starlink dish maintains proper alignment for optimal signal reception. Adjust if needed, following manufacturer guidelines.
Look for Rust: If any component shows rust, it needs attention. Apply a rust inhibitor or touch-up paint to protect the integrity of the mount.
Clean the Dish: Wipe the surface of the satellite dish with a damp cloth to remove dust or bird droppings that can interfere with signal strength.
Review Cabling: Ensure that the cables are securely fastened and protected from the elements to prevent signal loss or electrical hazards.
By adhering to these guidelines, you safeguard the quality and reliability of your Starlink satellite internet service.
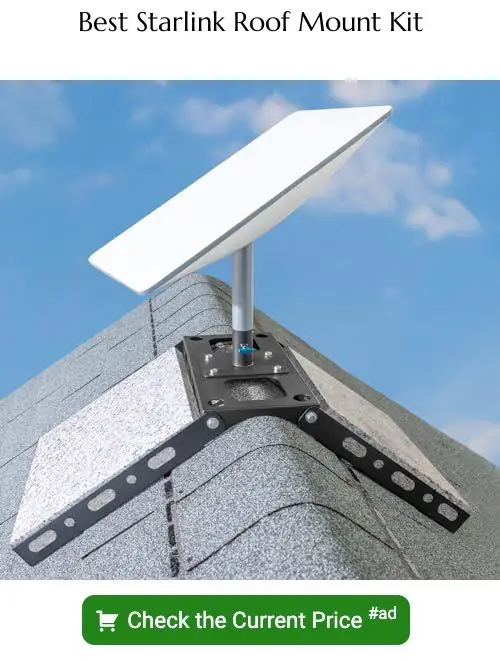
Product Comparison: Baird Starlink Roof Peak Mount Vs. Non-Penetrating Roof Mount
When choosing between the Baird Starlink Roof Peak Mount and the Non-Penetrating Roof Mount, consider the following differences:
1. Installation Method: The Baird mount is designed to attach directly to the roof peak with screws, ensuring a secure fit and optimal positioning. Conversely, non-penetrating mounts use weights or braces to hold the system in place, eliminating the need for drilling holes.
2. Roof Compatibility: Baird mounts are generally suitable for standard pitched roofs, while non-penetrating options are adaptable to flat roofs or locations where property owners prohibit alterations.
3. Durability: Both options are constructed to withstand the elements, but permanent fixtures such as the Baird mount may offer increased stability against high winds when installed correctly.
4. Portability: Consider a non-penetrating mount if there’s potential for relocation, as it can be disassembled and moved more easily than a screwed-in solution.
5. Aesthetic Impact: A Baird mount is less obtrusive at the roof’s peak, whereas non-penetrating mounts might be more visible, potentially affecting the structure’s aesthetic.
Each mount has distinct benefits that cater to different needs and preferences, ensuring there’s a viable option for various installation scenarios.
Troubleshooting Common Issues
Occasionally, you might encounter issues with your Starlink Roof Mount. Here are some tips to help resolve common problems:
1. Signal Disruption: Objects like tree branches or new structures can block the line of sight to the satellite. Prune any foliage and consider relocating the mount to avoid obstructions.
2. Loose Mounting Hardware: Over time, bolts and brackets can loosen. Check and tighten them to ensure the dish remains stable, especially after severe weather events.
3. Water Leakage: If you notice water intrusion near the mount, reseal any compromised sealant around the base and replace damaged flashing if necessary.
4. Poor Connectivity: This can be due to misalignment. Access the Starlink app to recalibrate the dish’s position for optimal signal reception.
5. Cable Wear: Inspect the cables for signs of wear or animal damage. Replace any frayed or chewed cables to maintain uninterrupted service.
When troubleshooting, always adhere to safety guidelines and manufacturer’s instructions. If problems persist, contact Starlink customer support for professional advice.
Warranty and Customer Support Options
Starlink’s warranty policy assures purchasers that the roof mount is free from manufacturing defects for a period of 12 months from the date of receipt. During this window, damaged or defective mounts can typically be exchanged or repaired free of charge, aside from the shipping costs, which might vary based on location.
In situations where the issue extends beyond this period or is related to installation errors or unforeseen damages, customer support becomes the go-to resource. This service provides guidance on troubleshooting problems, finding replacement parts, or scheduling repairs. Support channels include a comprehensive online help center, email communication, and customer service hotlines.
Furthermore, the company often updates its online resources with FAQs and video tutorials to assist users with self-service maintenance and problem-solving. These proactive steps are designed to simplify issue resolution and minimize downtime. If an issue can’t be resolved remotely, certified technicians can often provide in-home service, subject to availability and additional charges.
FAQ
What is the best roof mount for Starlink?
The Baird Starlink Roof Peak Mount, crafted from hot dip galvanized heavy gauge steel, is the best roof mount for Starlink due to its robust construction and ability to secure the satellite dish for optimal signal reception.
Can Starlink dish be mounted on roof?
Yes, a Starlink dish can be mounted on the roof using a Pivot Mount and a freshly installed Flashing Mount.
How important is the angle of the roof for Starlink dish installation?
The angle of the roof is crucial for Starlink dish installation as it affects the satellite’s line of sight and the efficiency of the internet connection.
Are certain roof materials more suitable for Starlink dish installation than others?
Yes, flat and durable roof materials such as metal or asphalt shingles are more suitable for Starlink dish installation due to their stability and robust nature.
What precautions should be taken when mounting a Starlink dish on a roof?
When mounting a Starlink dish on a roof, one should ensure a secure attachment, choose a location with a clear view of the sky, avoid power lines, and keep in mind safety measures to prevent falls and injuries.


