Last updated on
Discover the essential steps to construct a durable and attractive gazebo roof with our comprehensive guide, simplifying the process for even novice builders.
Are you looking for a way to add some charm and functionality to your backyard? A gazebo is a great addition that can provide shade, shelter, and a beautiful focal point for outdoor gatherings. However, building a gazebo roof can seem like an intimidating task.
But fear not! In this article, we will guide you through the process of building your own gazebo roof step-by-step. With our expert tips and clear instructions, you’ll be able to create the perfect roof that will not only protect you from the elements but also enhance the aesthetic appeal of your outdoor space.
So let’s get started!
Gazebo Roof Styles

When it comes to gazebo roof styles, there are several options to choose from. The style you select will depend on your personal preference and the overall design of your backyard space.
Some popular gazebo roof styles include hip roofs, gable roofs, and pyramid roofs.
Hip roofs have four sloping sides that meet at a point in the center of the roof. This style is ideal for larger gazebos as it provides ample shade and protection from rain.
Gable roofs have two sloping sides that form a peak in the center of the structure. This classic look is perfect for smaller gazebos or those with limited space.
Pyramid-style gazebos feature four equal triangular sides that slope upwards towards a central point at their apexes forming an elegant shape which can be used as an attractive focal point in any garden setting.
Choosing the Right Pitch
The pitch, also known as the slope or angle of the roof, determines how much water and snow it can handle. A steeper pitch will allow for better drainage and prevent water from pooling on top of your roof.
When choosing the right pitch for your gazebo roof, you should take into account several factors such as climate conditions in your area, local building codes requirements and personal preferences. For instance, if you live in an area with heavy rainfall or snowfall during winter months then a steeper pitched-roof may be more suitable to avoid any potential damage caused by excess weight accumulation.
On the other hand, if you prefer a more open-air feel with less shade coverage then a flatter pitched-roof may be ideal for allowing natural light to filter through while still providing some protection from direct sunlight.
Materials for Gazebo Roof
The material you choose will determine the durability and aesthetic appeal of your gazebo roof. There are several options available for roofing materials, including wood shingles, asphalt shingles, metal panels or tiles.
Wooden shingles are a popular choice for their natural look and feel but require regular maintenance to prevent rotting or warping over time. Asphalt shingles offer an affordable option that is easy to install but may not be as durable in extreme weather conditions.
Metal roofs provide excellent protection against harsh weather elements such as rain and snow while also being long-lasting with minimal maintenance required. However, they can be more expensive than other options.
Ultimately your choice of material will depend on factors such as budget constraints and personal preferences regarding aesthetics versus practicality.
Tools for Building a Roof
Having the right tools can make all the difference in ensuring that your project runs smoothly and efficiently. Here are some of the necessary tools for building a gazebo roof:
1. Circular saw: A circular saw is an essential tool for cutting lumber to size.
2. Power drill: You’ll need a power drill to create pilot holes and drive screws into place.
3. Hammer: A hammer is useful for nailing down shingles or attaching flashing.
4. Level: To ensure that your roof is level, you’ll need a reliable level tool.
5. Measuring tape: Accurate measurements are crucial when building any structure, so be sure to have measuring tape on hand at all times.
6. Square ruler:A square ruler helps ensure accurate cuts and angles.
7. Ladder:Ladders help reach high places safely.
8. Roofing nailer:A roofing nailer makes it easier to attach shingles quickly.
Preparing the Construction Site
This will ensure that the foundation is stable and level, which is essential for a sturdy and long-lasting structure.
Firstly, clear the area where you plan to build your gazebo roof of any debris or vegetation. Make sure there are no rocks or roots that could interfere with the foundation.
Next, mark out where you want your gazebo to be located using stakes and string. Use a level to make sure everything is even before proceeding further.
Once this has been done, dig holes for each corner post of your gazebo according to its size specifications. The depth should be at least 2 feet deep so that it can withstand strong winds without tipping over easily.
After digging all four holes in their respective locations on-site as per design plans; fill them with concrete mixtures up until ground-level surface height (or slightly above).
Square Gazebo Roof Plans
A square gazebo roof is a popular choice for its simplicity and versatility. It can be easily adapted to fit any size or design of your gazebo.
To start with, you will need some basic plans that outline the dimensions and angles required for constructing a square-shaped roof. These plans should include details such as rafter lengths, pitch angle measurements, ridge beam specifications, sheathing requirements among others.
There are many resources available online where you can find free or paid square gazebo roof plans that suit your needs. You may also want to consult with an experienced builder who has constructed similar roofs before.
Once you have obtained suitable plans for your project, carefully study them before starting construction work on-site. Make sure all necessary materials are available beforehand so that there won’t be any delays during construction time.
Gazebo Corner Posts
They provide support and stability to the entire roof system, ensuring that it can withstand harsh weather conditions. When building a gazebo, it’s important to choose sturdy corner posts made from durable materials such as pressure-treated wood or metal.
The position of the corner posts is also crucial in determining how well your gazebo will stand up over time. The four corners should be positioned at equal distances from each other and square with one another for proper alignment.
To install corner posts correctly, you’ll need to dig holes deep enough into the ground so that they can support their weight without sinking or shifting over time. Once you’ve dug your holes, place a layer of gravel at the bottom before setting your post in place.
Make sure each post is level by using a spirit level tool before securing them with concrete mix around their base for added stability.
Gazebo Roof Foundation Ring
One of the most crucial steps is creating a foundation ring for your gazebo. The foundation ring will provide stability and support for your structure, ensuring that it can withstand harsh weather conditions.
To create a solid foundation ring, you’ll need to dig holes around the perimeter of where you want to build your gazebo roof. These holes should be deep enough so that they reach below the frost line in colder climates.
Once you’ve dug these holes, fill them with concrete and insert anchor bolts into each hole while still wet. After allowing time for curing (usually 24-48 hours), attach pressure-treated lumber boards onto these anchor bolts using nuts and washers.
These boards will form a sturdy base on which to construct your gazebo roof frame later on in this guide.
Installing the Roof Supports
These are essential for providing stability and support for your gazebo roof. The number of supports required will depend on the size of your gazebo and its design.
To install these supports, you’ll need to measure out where they should be placed according to your plans. Then, cut each support beam according to length using a saw or other cutting tool as needed.
Next, position each beam in place between two adjacent corner posts so that it is level with them both horizontally and vertically. Use clamps or braces if necessary until everything is secure before moving onto framing out any additional sections of roofing structure such as rafters or ridge beams which will come later in this process.
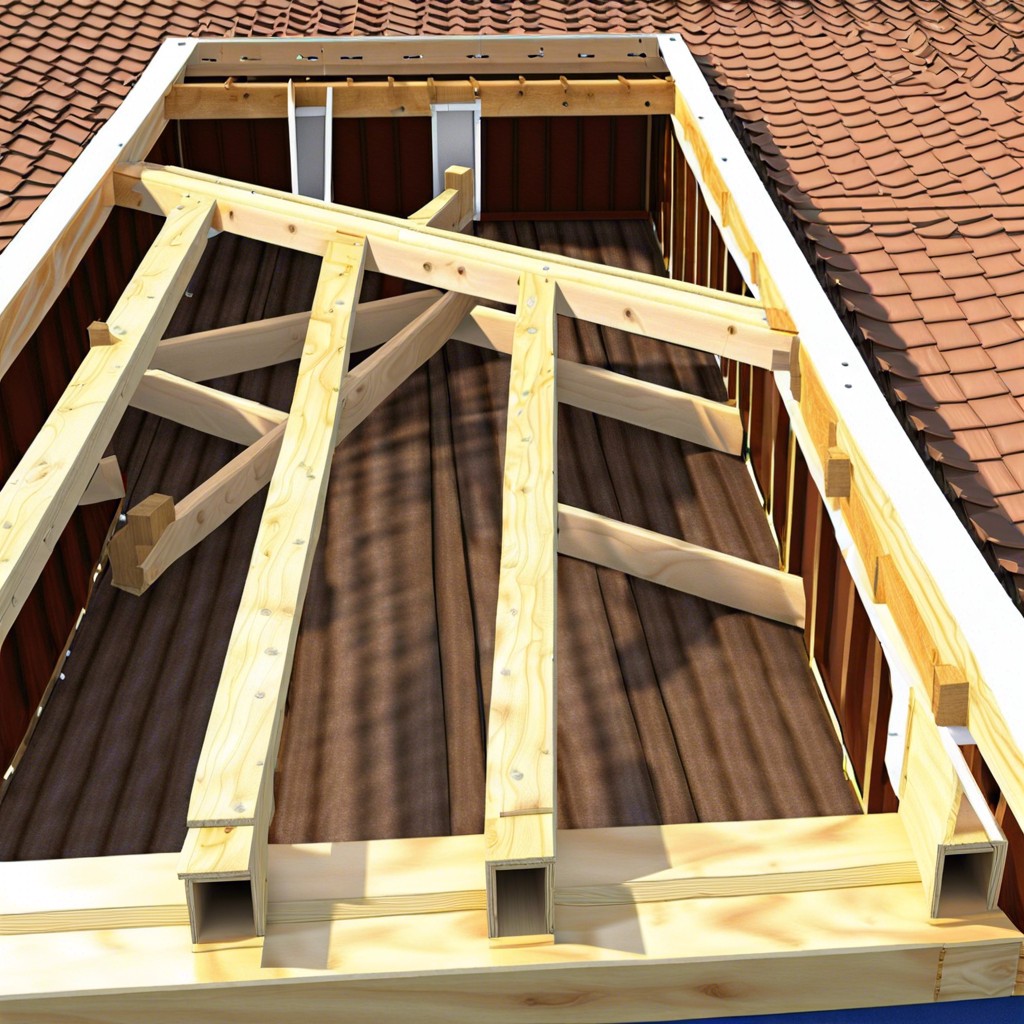
Framing the Roof Shape
This step is crucial as it will determine how sturdy and stable your roof will be. The first thing you need to do is measure and mark where each rafter should go on the top of your gazebo walls.
Next, cut a 2×4 board into two pieces that are equal in length to one side of your gazebo’s perimeter. These boards will serve as temporary supports while you frame out each section of the roof.
Using these temporary supports, attach a 2×4 board at each corner post so that they extend up above them by about six inches or more depending on how much overhang you want for your eaves.
Then connect these extended boards with horizontal beams along their lengths using metal brackets or nails if preferred. Make sure everything is level before proceeding further with attaching rafters onto this framework!
Framing out a square-shaped gazebo can be relatively easy compared to other shapes like hexagonal or octagonal gazebos which require more complex cuts and angles when framing out their roofs’ shapes.
Cutting and Shaping Roof Rafters
This step is crucial as it determines how well your gazebo roof will fit together and ultimately function. The first thing you need to do is measure the length of each rafter from one end of the ridge beam down to where it meets with a support post.
Make sure that all measurements are accurate before proceeding.
Next, use a saw or circular saw (depending on your preference) to cut each rafter according to its measured length. It’s important that all cuts are straight and precise for proper fitting later on.
After cutting, shape each rafter by making angled cuts at both ends so they can sit flush against both the ridge beam and support posts respectively. These angled cuts should be made at an angle equaling half of your chosen pitch angle (which we discussed earlier).
For example, if you chose a 30-degree pitch angle for your gazebo roof then these angled cuts should be made at 15 degrees.
Assembling Roof Rafters
This step is crucial as it determines the stability of your gazebo roof. Start by laying out all the rafters on a flat surface, making sure they are aligned correctly.
Next, take two adjacent rafters and attach them at their peak using a metal bracket or wood block. Repeat this process for all pairs of adjacent rafters until you have assembled half of your gazebo roof frame.
Then, carefully lift this half-frame onto one side of your gazebo structure and secure it in place with screws or bolts. Once secured, repeat the same process for assembling and lifting up the other half-frame onto its corresponding side.
Connect both halves together at their peaks using another metal bracket or wood block to complete your gazebo roof frame assembly.
Remember that precision is key when assembling rafter frames; even small deviations can cause significant problems later on in construction if not corrected early enough.
Installing the Ridge Beam
The ridge beam is a horizontal structural member that runs along the top of your gazebo and connects both sides of your roof. It provides support for all other rafters and helps distribute weight evenly across them.
To install a ridge beam, you will need two people to lift it into place. First, measure and cut your ridge board according to the length of your gazebo’s width.
Then position it at the peak where both sides meet with one end resting on each side.
Next, secure each end by nailing or screwing through pre-drilled holes in both ends into their respective support posts using galvanized nails or screws long enough for good penetration but not so long as they protrude out from under either post.
Securing Rafters to Supports
This is a crucial step in ensuring that your gazebo roof is stable and durable. To do this, you will need to use metal brackets or hurricane ties.
Firstly, position each rafter on its corresponding support beam and make sure they are level before securing them with screws or nails. Then attach metal brackets or hurricane ties at both ends of each rafter where it meets the support beam.
It’s important not to skimp on this step as inadequate fastening can cause your gazebo roof structure to fail during high winds or heavy snowfall. By using sturdy hardware like metal brackets and hurricane ties, you’ll ensure that your gazebo remains standing for years of enjoyment.
Sheathing the Roof
This step involves covering the frame with a layer of plywood or oriented strand board (OSB) that will serve as a base for your roofing material. Before starting, make sure that all of your rafters are level and evenly spaced.
Begin by measuring and cutting sheets of plywood or OSB to fit each section of your gazebo roof. Use galvanized nails or screws to attach them securely in place, making sure they are flush with each other at their edges.
It’s important not to leave any gaps between sheets as this can lead to leaks later on. If necessary, use construction adhesive along seams for added strength and waterproofing.
When installing sheathing around vents or chimneys, be careful not cut too much away from the sheeting; instead create an opening just large enough for proper ventilation while still maintaining structural integrity.
Adding Roof Underlayment
This layer of protection will help prevent water from seeping through the shingles and into your gazebo. There are different types of underlayment available, but most builders use felt paper or synthetic materials like polypropylene.
To install the underlayment, start at one corner of the roof and roll out a strip that covers about half of its width. Staple it in place along both edges with roofing staples spaced every 6 inches or so.
Then repeat this process on the other side until you reach the opposite corner.
Overlap each row by at least 2 inches to ensure complete coverage and avoid any gaps where water could penetrate through. Once you’ve covered all areas with underlayment material, trim off any excess using a utility knife.
Installing Roof Shingles
Shingles are an essential component of any roof as they provide protection against rain, snow, and other elements. Before installing shingles on your gazebo roof, make sure that you have all the necessary tools such as a hammer, roofing nails or staples gun.
Start by laying down a layer of underlayment over the sheathing to protect against moisture penetration. Then begin at one corner and work across in rows until you reach the opposite end.
Make sure each row overlaps with its neighbor by about 6 inches (15 cm) for proper water drainage.
When nailing down shingles use four nails per piece: two near each end and two spaced evenly between them along their length – this will ensure maximum stability during high winds or heavy rains.
Trim off any excess material around edges using a utility knife before adding flashing around chimneys or vents if needed.
Attaching Flashing and Drip Edge
These two components play a crucial role in preventing water from seeping into your gazebo roof. Flashing is typically made of metal and is placed around any openings or joints on the roof, such as chimneys or skylights.
Drip edge, on the other hand, is a narrow strip of metal that goes along the edges of your roof to direct water away from your structure.
To install flashing and drip edge properly:.
- Cut them to size using tin snips.
- Place them over their respective areas with an overlap onto shingles.
- Secure them in place with roofing nails every few inches.
Make sure you take extra care when installing these components since they can be easily damaged if not handled correctly.
Ventilation and Insulation
Without proper ventilation, moisture can build up inside the structure, leading to mold growth and rotting of the wood. Insulation is also important if you plan on using your gazebo year-round or in colder climates.
To ensure adequate ventilation, consider adding vents at both ends of the roof or installing a ridge vent along the peak of the roof. This will allow air to circulate freely through your gazebo and prevent any moisture buildup.
For insulation, you can use fiberglass batts or spray foam insulation between rafters before sheathing your roof with plywood. This will help keep heat inside during cooler months while also preventing condensation from forming on cold surfaces.
Gazebo Roof Decoration
There are many ways to decorate a gazebo roof, depending on your personal style and preferences. One popular option is adding hanging plants or vines that can drape over the edges of the roof and create a natural look.
Another way to enhance the appearance of your gazebo is by installing lighting fixtures such as string lights or lanterns. This will not only provide illumination for nighttime gatherings but also add an enchanting ambiance.
You could also consider painting or staining the wood in a color that complements your outdoor decor scheme. A fresh coat of paint can give an old-looking structure new life while adding personality and charm.
If you want something more elaborate than just simple decorations, consider hiring a professional artist who specializes in murals or mosaics to create custom designs on your gazebo’s ceiling panels.
Decorating your newly-built gazebo roof doesn’t have any limits; let creativity be at play!.
FAQ
What is the best material for a gazebo roof?
The best material for a gazebo roof is steel, due to its affordability, strength, durability, and widespread availability.
What is the minimum pitch for a gazebo roof?
The minimum pitch for a gazebo roof is 1/4 inch per foot.
Is it cheaper to build your own gazebo?
Yes, it is generally cheaper to build your own gazebo as the materials required are relatively affordable compared to the cost of a kit or hiring a contractor.
What are the essential steps for constructing a durable gazebo roof?
Essential steps for constructing a durable gazebo roof include selecting appropriate materials, creating a sturdy frame, adequately attaching rafters, and properly installing roofing materials like shingles, tiles, or metal sheets.
How do you properly waterproof a gazebo roof to prevent leaks?
To properly waterproof a gazebo roof and prevent leaks, apply a high-quality waterproof sealant or paint on the roof’s surface, ensuring full coverage and proper maintenance.
What are the common mistakes to avoid when building a gazebo roof?
Common mistakes to avoid when building a gazebo roof include improper measurements, inadequate support, incorrect materials, and not considering weather conditions.
Read More
 Parts of a Roof: Understanding Their Functions and Importance
 How Much Is a New Roof on a House? Costs & Factors to Consider
 Can You Walk on a Metal Roof Safely? Step-by-Step Guide
 How to Measure for a Metal Roof: Easy Step-by-Step Guide
 How to Negotiate Roof Replacement with Insurance: Steps for Effective Communication