Last updated on
Learn how to frame a roof step-by-step in this practical guide, covering everything from selecting materials to final installation.

Key takeaways:
- A roof framing plan provides a visual representation of the roof framework and includes dimensional information, material specifications, and load analysis.
- Key components of a roof frame include rafters, joists, ridge board, collar ties, rafter ties, valley rafters, and hip rafters.
- There are two main types of roof framing: truss framing and stick framing, each with its advantages and suitability.
- To create a roof framing plan, determine the roof type, gather accurate measurements, choose materials, design the layout of rafters and trusses, and consider local building codes and weather conditions.
- Examples of roof framing plans include standard gable roofs, hip roofs, mansard roofs, and shed roofs, each with different considerations for materials and design.
What Is A Roof Framing Plan?
A roof framing plan serves as a blueprint for constructing the roof of a building. It details the layout of structural elements, including rafters, trusses, and beams that provide support to the roof. Here are some key points to understand about a roof framing plan:
– **Visual Representation:** The plan presents a bird’s-eye view of the roof framework, showing the placement and relation of all critical components.
– **Dimensional Information:** It includes specific dimensions and angles necessary for cutting and assembling the frame, crucial for ensuring the roof’s stability and aesthetic appeal.
– **Material Specifications:** The plan specifies materials required, accommodating building codes and climate conditions to guarantee durability and safety.
– **Load Analysis:** It assesses the loads, such as snow or wind, that the roof must endure, crucial for selecting appropriate materials and design features to combat these forces effectively.
By laying out this critical information, a roof framing plan helps streamline the construction process and aids in building a sturdy, well-proportioned roof.
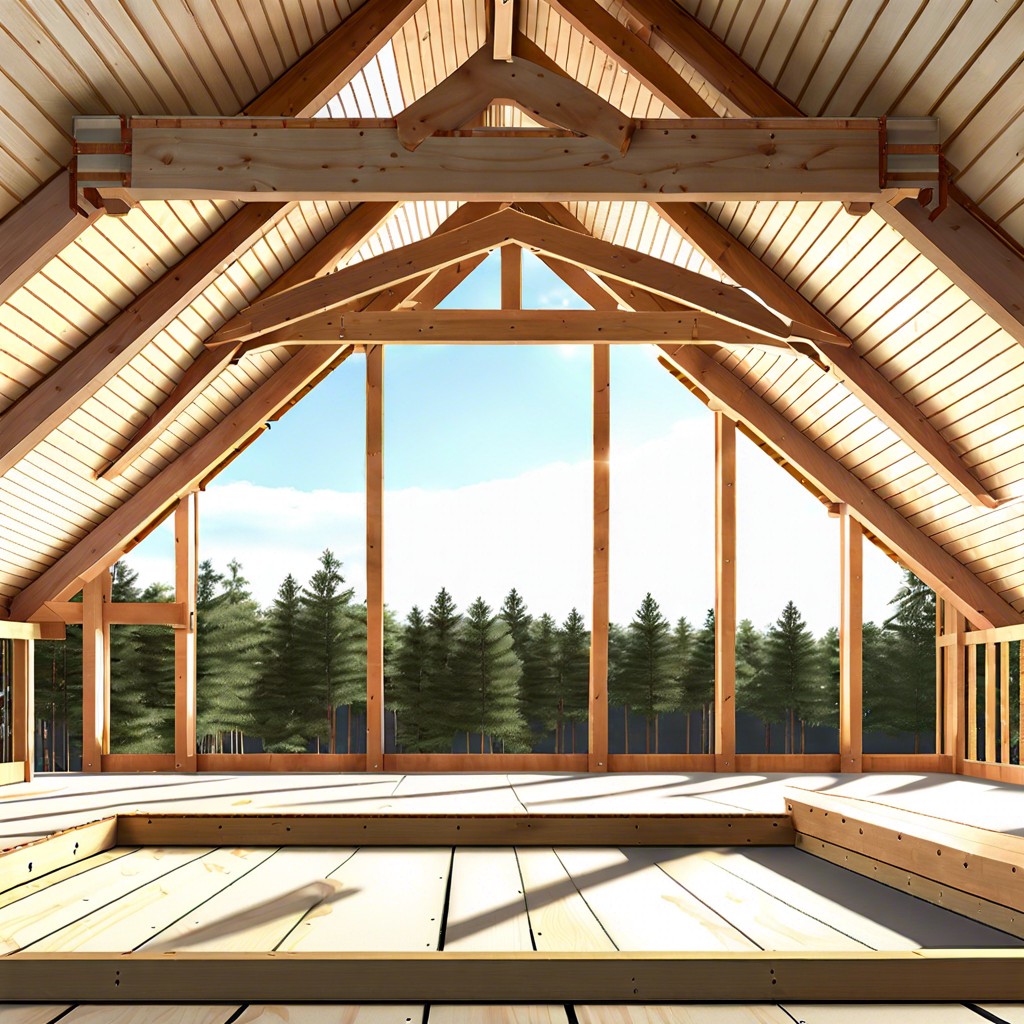
Parts of a Roof Frame
Understanding the components of a roof frame is essential for both novice and experienced builders. Here are the key elements you’ll encounter:
– **Rafters:** These are the sloping beams that hold up the roof. They run from the peak of the roof down to the walls of the house.
– **Joists:** Similar to rafters, but generally run horizontally and are used mainly for ceilings or flat roofs.
– **Ridge Board:** A horizontal beam that runs along the peak of the roof. Rafters attach to this board at the top.
– **Collar Ties:** Horizontal braces between opposite rafters. They help to prevent the roof from spreading or collapsing and are usually positioned near the upper third of the rafter length.
– **Rafter Ties:** Positioned lower than collar ties, these are used to bind the rafters together resisting the outward push of the roof, thus keeping the walls from spreading.
– **Valley Rafters:** These are used where two parts of the roof intersect, running diagonally at the junction to provide additional support.
– **Hip Rafters:** They form the junction between two sloping sides of the roof that meets at a corner.
Each component plays a critical role in maintaining the structural integrity and shape of the roof. Proper installation and maintenance of these parts ensure the roof’s longevity and performance.
Types of Roof Framing
Roof framing can be broadly categorized into two main types: truss and stick framing.
Truss roofing systems involve pre-fabricated triangular units made in a factory setting. They are popular for their speed of installation and cost-effectiveness. Trusses are ideal for uniform designs like those seen in residential subdivisions.
Stick framing, on the other hand, is built on-site, piece by piece. This method offers flexibility for custom designs and is often used in unique or architecturally complex homes. While it requires more skill and time than truss framing, it allows for creative freedom in the roof’s shape and size.
Both types have their advantages depending on the project requirements, budget, and desired aesthetic. Careful consideration of each will guide you to the best choice for your specific roofing project.
How to Create a Roof Framing Plan?
Creating a roof framing plan requires attention to detail and an understanding of building physics. Here’s how to kick-start the planning process:
- Start by determining the roof type best suited to your building. Whether it’s gable, hip, or any other style, your choice affects the complexity and materials needed.
- Gather accurate measurements of the building’s walls and overall footprint. These dimensions are critical as they define the perimeter of the roof and help in calculating the pitch and length of rafters.
- Choose your materials wisely. The type of wood, thickness of beams, and type of nails or screws can influence both the structural integrity and cost-effectiveness of your roof.
- Design the layout of rafters and trusses. This step involves precise calculations to ensure that each component of the roof frame supports the appropriate amount of weight. Software or a skilled architect can aid in this intricate process.
- Consider local building codes and weather conditions. Make sure your roof framing plan adheres to regional regulations and is equipped to handle the environmental stresses it will face.
- Document every detail in your roof framing plan. This clarity helps prevent misunderstandings during construction and ensures that everyone involved has a clear blueprint to follow.
Embarking on a proper framing plan sets a solid foundation for a durable and efficiently constructed roof.
Roof Framing Plan Examples
Roof framing plans vary based on the structural needs and architectural style of a building. Here are a few common examples to illuminate the varied strategies used in roof construction:
– **Standard Gable Roof**: This plan features two sloping sides that come together at a ridge, creating a triangle section on the side of the house. It’s straightforward and efficient for shedding water.
– **Hip Roof**: All sides slope downwards to the walls, usually at a gentle slope. This design provides stability and durability against high winds.
– **Mansard Roof**: Characterized by two slopes on each side, the lower slope is steeper than the upper. This style maximizes living space under the roof.
– **Shed Roof**: Also known as a lean-to, this is a single, sloping roof surface, commonly used for additions or with modern home designs.
Each design requires different planning for materials, weight distribution, and aesthetic considerations. Understanding the specific mechanics and requirements of your chosen roof style goes a long way in ensuring a sturdy and visually appealing home.
Read More
 How to Clean Solar Panels on Roof Automatically: Simple Steps for Maintenance
 Roof Rake Buying Guide: Choose the Best Model for Your Home
 Metal Roof Repair: Step-by-Step Guide for Quick Fixes
 Roof Tarping: How to Secure Your Home After a Storm
 Roof Vent Installation: Step-by-Step Guide for Homeowners