Last updated on
Learn the step-by-step process of properly ventilating a bathroom fan through the roof to ensure efficient moisture removal and prevent structural damage.
Key takeaways:
- Tools required: drill, hole saw, saw, ladder, caulking gun, wire strippers, tape measure, screwdriver
- Materials required: vent cap, ducting material, roofing sealant, screws, backdraft damper
- Determine fan size: CFM based on bathroom area and fixtures
- Install and seal roof vent cap: cut hole, position and secure cap, connect duct
- Ensure proper electrical wiring: turn off power, connect wires, insulate connections
Tools Required

To successfully vent a bathroom fan through the roof, you’ll need several tools at the ready:
- Drill – A reliable power drill will be necessary for creating an initial hole through the roof for the vent.
- Hole Saw Attachment – This drill bit should match the diameter of your vent duct for precise cutting.
- Jigsaw or Reciprocating Saw – Depending on the material of your roof, a saw may be preferred to cut through shingles or sheathing.
- Ladder – A sturdy ladder ensures safe access to your roof.
- Caulking Gun – Essential for applying sealant to the roof vent to prevent leaks.
- Wire Strippers – If any wiring is required, you’ll need these to correctly prepare electrical connections.
- Tape Measure – Accurate measuring is key to positioning the vent properly and ensuring the ductwork fits.
- Screwdriver or Screw Gun – This will be used for securing the vent cap and fan unit.
Be sure that each tool is in good working condition before commencing the installation to ensure a safe and efficient process.
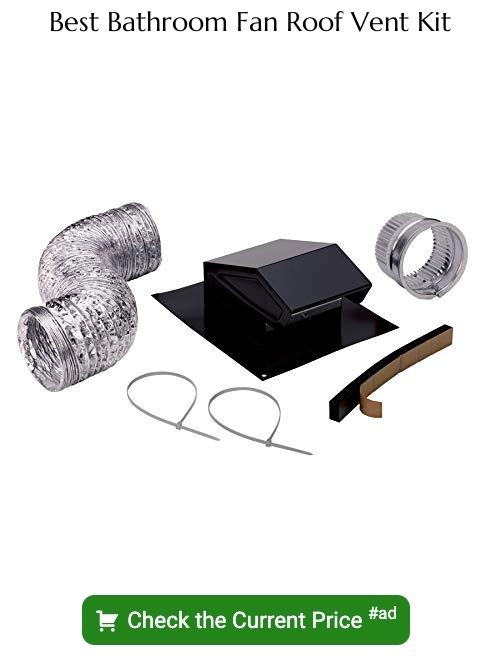
Materials Required
Before embarking on the installation process, gathering all necessary materials ensures efficiency and safety. You will need a vent cap specifically designed for bathroom exhaust, typically made of galvanized steel or aluminum to withstand weather conditions. Ducting material, such as flexible aluminum or rigid metal duct, is essential for channeling air from the fan to the outside. Roofing sealant and appropriate screws are crucial for securing the vent cap and creating a watertight seal. Additionally, consider purchasing a backdraft damper, which prevents outside air from flowing back into the duct. Always select materials compatible with the specific dimensions and requirements of your exhaust fan and roofing type.
Determine the Size of the Bathroom Exhaust Fan
Understanding the proper size for a bathroom exhaust fan is crucial for both efficiency and performance. The fan’s capacity is measured in cubic feet per minute (CFM), representing the volume of air it can move each minute. To calculate the necessary CFM rating for your bathroom:
1. Measure the Space: Calculate the volume of your bathroom by multiplying its length, width, and height.
2. Standard Requirement: A basic rule is to have at least 1 CFM per square foot of bathroom area.
3. Consider the Ceiling Height: For bathrooms with ceilings higher than 8 feet, adjust your CFM requirements accordingly.
4. Add for Fixtures: For bathrooms with a jetted tub or shower, add an additional 50 CFM per fixture.
Once calculated, select a fan model that meets or exceeds your calculated CFM requirements to ensure adequate ventilation. This will prevent mold growth, remove odors, and control humidity effectively. Remember to account for any bends or turns in ductwork, as these can reduce the fan’s efficiency; you might need a fan with a higher CFM to compensate for any resistance in the ducting path.
Install and Seal the Roof Vent Cap
Begin by cutting a hole in the roof accurately sized to fit the diameter of your vent cap. Position the hole between the rafters and away from any obstructions. Slide the vent cap flashing under the shingles above the hole, ensuring the top part of the flashing is beneath the shingles while the bottom part rests on top. This overlapping technique channels water over the vent, preventing leaks.
Apply a bead of roofing sealant under the shingles surrounding the vent cap for a watertight seal. Avoid excess sealant, as it can create a mess and does not contribute to a stronger bond. Secure the vent cap to the roof with nails or screws appropriate for roofing material, typically provided with the vent cap kit.
Once the vent cap is attached, connect the exhaust fan duct to the vent cap using clamps or aluminum tape to ensure a secure and air-tight passageway. Aluminum tape offers the advantage of lower risk of loosening over time compared to duct tape.
Finally, assess the installation for any gaps or possible leak entry points, applying additional sealant if needed. It’s essential to maintain integrity of the roof while ensuring adequate ventilation for moisture-laden air to exit your bathroom efficiently.
Ensure Proper Electrical Wiring for the Fan
Before proceeding with the wiring, ensure that the power is turned off at the circuit breaker to avoid electrical hazards. Confirm the power off status using a voltage tester at the wiring connections.
The wiring process involves connecting the fan’s wires to the house wiring, typically matching the wire colors—black to black for hot, white to white for neutral, and green or bare copper to green or bare copper for the ground. If your fan includes a built-in light or heater, additional wiring may be required, often indicated by extra colored wires.
Use wire nuts to secure wire connections and electrical tape to insulate them. After connecting the wires, tuck them neatly into the fan housing to prevent any interference with the fan’s operation or possible damage during installation.
If wiring is not your expertise, consult or hire a licensed electrician to ensure compliance with local electrical codes and safety standards. Properly wired, your bathroom fan will perform efficiently and safely, effectively removing moisture and odors through your newly installed roof vent.
Read More
 How to Clean Solar Panels on Roof Automatically: Simple Steps for Maintenance
 Roof Rake Buying Guide: Choose the Best Model for Your Home
 Metal Roof Repair: Step-by-Step Guide for Quick Fixes
 How to Frame a Roof: Step-by-Step Instructions for Beginners
 Roof Tarping: How to Secure Your Home After a Storm